Pages

Thursday, 8 September 2016

LAUNCH DAY- Creative Expressions Craft Die By Sue Wilson- Indian Ocean Collection

Afternoon fellow crafters. What a day we've had, launching the new Creative Expressions Craft Dies by Sue Wilson. Take a look at what's been going on today over on Sue's blog and our Facebook page, starting with the Indian Ocean Collection.

We have a stunning collection of matching stamps to co ordinate with the Indian Ocean Collection Dies. Take a look below, which is your favourite?

Indian Ocean Collection


Indian Ocean Collection- Background CED10011


Indian Ocean Collection- Border and Corners CED10012 Indian Ocean Collection- Tag Duo CED10013


Indian Ocean Collection- Mauritius CED10014

Co-ordinating Stamps to Die For...


Poppy Garden UMS746 & Sunlit Daisies UMS747


Indian Ocean Collection- Seychelles CED10016

Co-ordinating Stamps to Die For...


Tropical Pansies UMS748 & Baroque Blossoms UMS749


Indian Ocean Collection- Maldives CED10015

Co-ordinating Stamps to Die For...


Decorative Driftwood UMS744 & Sweet Sunflowers UMS745


We will be back tomorrow for another daily round up at 6.30pm but if you cant wait until then follow Sue Wilson's blog and facebook page to keep up to date through out the day.

Sue Wilson Blog: particraft.blogspot.co.uk
Sue Wilson Facebook page: @SueWilsonCraftingMyStyle

Workshops September & October 2016

Christmas Card Class with Julia Watts
21st September 2016 10am-1pm and 2pm-4pm

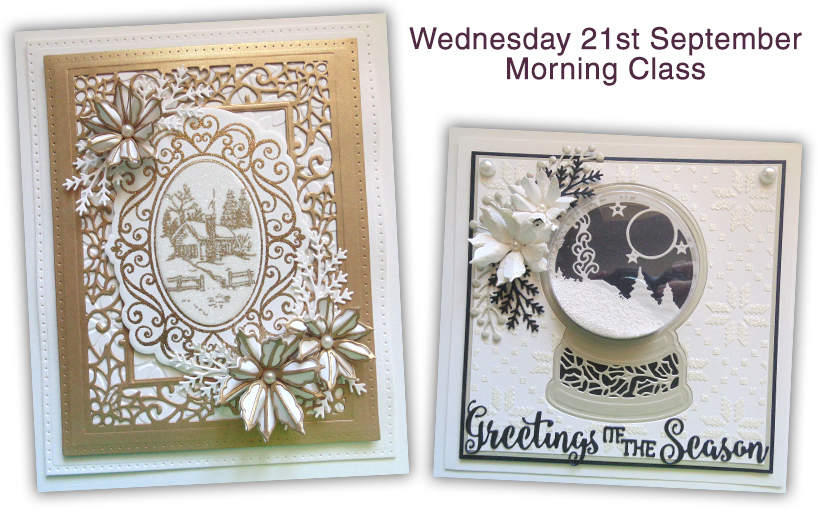
Want to try something new for your Christmas cards this year? Julia will be teaching you various styles and techniques in her 2 latest workshop classes. Come along to the morning or afternoon class, or if you want to make more of a day of it, come along to both and take 4 projects away with you!

This is only a small class and it's a great way to meet other like minded crafters and get some expert guidance from your Tutor.


The morning class will run between 10am -1pm and cost £30. In this workshop, you will be die cutting, stamping, embossing, using Cosmic Shimmer Sparkle Texture Paste with a mask and creating dimensional flowers. If you have ever wanted to learn how to create a shaker card then this is the class for you. You will be using the new Creative Expressions Snowglobe Die by Sue Wilson alongside Treat Cups to create a beautifully festive card. 

BOOK YOUR SPACE HERE


The afternoon class will run between 2pm - 4pm and costs £20. In this workshop, you will be die cutting, stamping, embossing and creating dimensional flowers. You will have tips, tricks and techniques explained by Julia to increase your skills. Take away 2 projects with you ready to send someone a special Christmas wish.

BOOK YOUR SPACE HERE


Stamping Masterclass with Julia Watts 
12th October 2016: 10am-4pm £40


Increase your stamping skills with Julia Watts, who will be teaching you how to perfect your stamping and show you new ways to use your stamps. For inspiration and ideas come along to this workshop and create some truly beautiful cards.

This is only a small class and it's a great way to meet other like minded crafters and get some expert guidance from your Tutor.


BOOK YOUR SPACE HERE


Monday, 15 August 2016

Christmas Card Masterclass with John Lockwood 24th August 2016

Want to try something new for your Christmas cards this year? John will be teaching you how to use Cosmic Shimmer Polished Silk Glitter in different ways, using masks and stamping with Cosmic Shimmer Sticky Embossing Powder to create dimension. You will create 1 card using a variety of products to achieve a professional looking 'Seasons Greetings' card for that special someone. 

This is only a small class and it's a great way to meet other like minded crafters and get some expert guidance from your tutor.

The Masterclass sessions will run on Wednesday 24th August. Session 1 will run from 10am till 12.30pm and Session 2 will run from 1.30pm till 4pm. Cost per person is £25 per session or £45 full day.

To book click, the button below or call Tracey on 01536 481 778. We only have a few spaces left for this Masterclass Workshop so book now to avoid disappointment.


Tuesday, 2 August 2016

Festive Swirling Stars Craft Die Gift Bag

Today's blog post comes from designed team member Wenche Jensen


Our Die Team have been using the Creative Expressions Craft Dies by Sue Wilson Festive Swirling Stars in this weeks blog projects. Keep an eye out for the next installment this Saturday. 

Shopping list:
Creative Expressions Craft Dies by Sue Wilson Festive Swirling Star CED3056
Creative Expressions Craft Dies by Sue Wilson Festive Snowflakes CED3020
Creative Expressions Craft Dies by Sue Wilson Australian Collection Melbourne CED8105
Sentimentally Yours Timeless 8 x 8 Paper Pad SYTPPC
JustRite We Are Having a Baby Stamp Set JRCR-05008


Step 1. I've created a simple, small gift bag on the basis of a long, narrow paper bag, 'hot dog bag'.
In the bag I want to put a little candy roll and fold the length of the bag to fit this. On the back I attach a cord, which will be the fastener of the bag. 

Step 2. Now cover the paper bag with patterned paper. I do this equally on both sides of the bag. The sheet covers the cord too.

Step 3. The CED3056 Festive Collection Swirling Stars cuts in a long strip and can be cut to create smaller star swirls.

Step 4. Now assemble the die cuts as you wish, i have also added a snowflake from the Creative Expressions Craft Dies by Sue Wilson Festive Snowflakes Die set and used a sentiment from the JustRite We Are Having a Baby Stamp Set.

 Place your contents in your bag and tie closed. 


More places to find Wenche:


Saturday, 30 July 2016

How to make a Tie Dye Tote Bag using Cosmic Shimmer Fabric Paints

Designed by Design Team member Liz Borer


Our design team have been tasked this month with creating something using the new Cosmic Shimmer Fabric Paints. Liz has used her paints to create this pastel tie dye effect with these stunning silhouette butterflies and plants. 

Shopping list:


Step 1. I decorated both sides of the bag ,so insert a piece of card covered with cling film inside the bag to protect the other side while painting. I coloured the whole of the fabric with the Cosmic Shimmer Fabric Paints, which were thinned with water before applying them . I found it helped to dampen the fabric first and then start applying the first colour in random patches . Pick up a bit more water and blend the colour out onto the fabric .


Step 2 In exactly the same way add the other colours . I used Golden Lime , Antique Copper , Sea Green and Royal Purple . As the colours are blended out they mix with each other creating new colours . I mixed Royal Purple and Sea Green together and painted the handles . If both sides are to be decorated, dry the first side before starting on the other.


Step 3 Mix Atlantic Blue and Graphite Noir and stencil the polka dots randomly over the bag.


Step 4 Mix Golden Lime , Atlantic Blue and Sea Green together to make a bright green . Stencil the Peacock feather design up from the bottom of the bag.


Step 5 Use French Pearl and stencil the swirls from the All Stirred up mask randomly over the bag.


Step 6 Here you can see that I extended the swirls up onto the handles .


Step 6 Using the leaf stamp from Summer Meadow and Graphite Noir paint , stamp leaves over the bag to start the vines . Because the same paint is used it's possible to stamp the stems over the the leaves of the previous image without it showing so the leaves can join together to form a vine . It's interesting that where the black goes over the stencilled colours they partially show through creating a nice texture.


Step 7 The stem of the flower from the Wild Flowers set can be curved to the right or left when stuck on an acrylic block . Stamp the flower as though it was growing from the vines . Curving the stem creates movement in the design. Remember to leave space for some butterflies  ( from Butterfly Splash ) which are stamped with the same paint .


These final two pictures show the finished bag , including the butterflies , from both sides . I didn't try to make the sides match , it's more fun to have them looking slightly different !
I really enjoyed using these fabric paints , they are lovely and thick for painting solid areas areas and stamping . They can also be diluted to create washes and still retain the pearly lustre .


Wednesday, 27 July 2016

The new MUST HAVE crafting item; the amazing DCWV Projcet Stacks

The Creative Expressions office is a buzz with the arrival of some amazing new products from DCWV; Project Stacks. These project books are fabulous for any level of crafter. They contain eveything you need to make the projects plus full instructions. Available now from your favourite craft retailers or on HOCHANDA TV on a One Day Special with Sarah Hurley, starting this Friday 29th of July at 8pm and going live on Saturday at 9am/12pm/4pm and 7pm. We know they will be massively popular - we all have them on our wish lists..now how to explain how ESSENTIAL it is to own one or two...

Keep scrolling for the product pictures, plus what our Design Team member Lisa Horton has been crafting, what Sarah Hurley has made for the HOCHANDA show and what Tracey, our in-house Crafter has whipped up...


Haven't they done an amazing job on these flowers - posies or wreaths to brighten up any space and easy to put together - decorate anything you like to give it a 3D effect or pop them in a vase - just don't water them!


Below we can see just how effective the Cone Wreath Project Stack is. Lisa Horton made the Christmas Wreath and Sarah Hurley has gone for a bit more of a summery feel. This pack contains some really beautiful papers with different patterns, textures and finishes. 


Tracey has been using more of the Project Stacks to create a whole variety of beautiful items from bunting, to cards, to MDF flower wreaths made in very popular neutral tones. See.. we told you..amazing!

 Photo Credit: Traci Mclean